Image Processing #10 - Zoom in animation
이미지
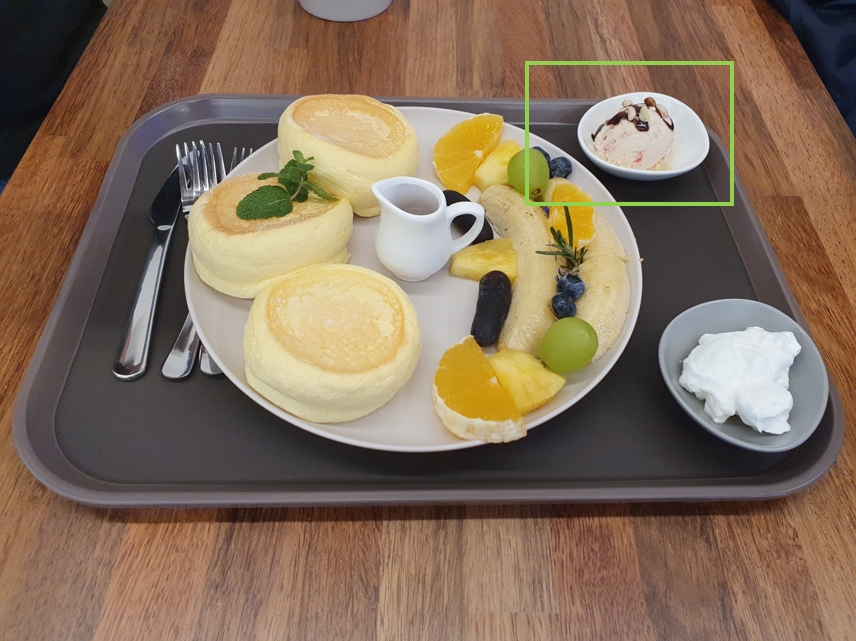
 I like to make various effects using OpenCV. If I knew how to use image processing programs such as video editing programs and Photoshop, I would probably have used these programs. But I am a programmer and I can hardly use these programs. So I enjoy using OpenCV to implement the effects I want. Zoom in Suppose you want to zoom in to a specific area in the original high-resolution image as shown below.   The final image area is marked with a box. And the display will use images of this box size. If you zoom in while maintaining the original resolution of image, the resolution will be much lower because you will need to zoom in on the gradually smaller image. This method is also possible, but I don't want the image resolution to be lowered. So at first, we will start zooming in by reducing the original image to the size of the box image. During zoom-in, the size of the image will gradually become similar to the size of the box, and the final image will be the box image. T...

Install OpenCV 4.4 on Raspberry Pi

이미지
 I often work with OpenCV in Raspberry Pi or the Jetson series. In the NVidia Jetson series, OpenCV is optimized and comes with the Jetpack installation. As a result, you do not need to install OpenCV separately. However, because Raspberry Pi OS is not installed with OpenCV, users must install it themselves. Unlike the Jetson series, Raspberry Pi has no GPU to use Cuda. The Mali GPU, used by Raspberry Pi, is used only for graphics and is difficult to use in OpenCV to speed up the OpenCV processing speed. Therefore, OpenCV used by Raspberry Pi does not require special optimization. Therefore, it is less necessary to build and use the source code. The case of building the source code is probably when you need the latest version of OpenCV. If you want to use an already verified version rather than the latest version, you can easily install it by following the steps below. Install Raspberry Pi OS on the Rpi4B I will use Raspberry Pi 4 B+ 2GB memory model and the OS will use Raspberry P...

Video Processing Speed up

이미지
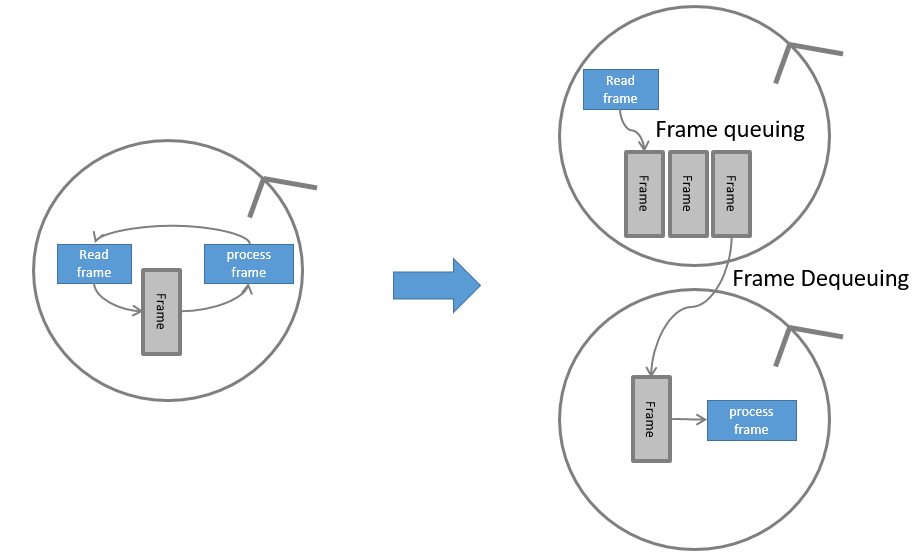
The structure of reading video files and processing frames in OpenCV is as follows. cap = cv2 . VideoCapture( videofile) while True : ret, frame = cap . read() if ret == False : break ''' Do what you want to do ''' cv2 . destroyAllWindows() cap . release() In the while loop, the cap.read() function is responsible for reading frames from the video file. This function is fast on devices with good CPU performance, but SBC like Raspberry Pi has a lot less CPU performance than PC. The time it takes to process the cap.read() function depends on the video file. If the video file frame size is large, or if a video codec that requires a lot of time in the decoding process is used, the frame reading time will be longer. In the code above, the while loop consists of two parts. Read video frame Process of processing the read frame according to the purpose However, since these operations are performed sequentially, processing c...

Creating TetrisClock using OpenCV #2

이미지
Implementing text tetris In the previous article, you learned how to implement numbers. This time, I will port the character tetris implemented by Brian Lough to Python in https://github.com/toblum/TetrisAnimation/blob/master/src/TetrisLetters.h . It is not very different from the previous number implementation. You only need to port the values ​​of the fall_instr_let structure that makes up the character. Original code analysis Character Analysis You can find out by looking at https://github.com/toblum/TetrisAnimation/blob/master/src/TetrisLetters.h for Tetris character. This header file contains information that can represent the characters from ascii code 33 (!) To ascii code 90 (Z) in tetris. // // ASCII characters // // ********************************************************************* // ascii 33 - ! // ********************************************************************* fall_instr_let a33[ 5 ] = { { 0 , 0 , 2 , 16 , 0 }, { 2 , 5 , 3 , 13 , 2 }, {...

Creating TetrisClock using OpenCV #1

이미지
Do you know TetrisClock? TetrisClock is a WiFi clock made of falling tetris blocks. Runs on an ESP32 with an RGB LED Matrix. <TetrisClock on the RGB LED Matrix by Brian Lough> I'm a big fan of RGB LED matrix and I wrote many posts about RGB LED Matrix in my blog . I like to display the screen using OpenCV on the Raspberry Pi to the RGB LED Matrix. However, the TetrisClock shown in the figure above works on the Arduino family of ESP32 MCUs. I also posted a post implementing TetrisClock on ESP32 at https://iot-for-maker.blogspot.com/2020/04/led-9-rgb-led-matrix-drive-with-esp-32.html . But I wanted to implement this beautiful clock in Raspberry Pi, so I googled hard, but couldn't find any good examples. Eventually, I decided to analyze the code written in C language and implement it in Python and OpenCV. In the picture above, it consists of four large numbers indicating hours, minutes and small letters indicating morning(AM) and afternoon(PM). Original code analysis Number ...
