라벨이 Raspberry Pi인 게시물 표시

Creating TetrisClock using OpenCV #1

이미지
Do you know TetrisClock? TetrisClock is a WiFi clock made of falling tetris blocks. Runs on an ESP32 with an RGB LED Matrix. <TetrisClock on the RGB LED Matrix by Brian Lough> I'm a big fan of RGB LED matrix and I wrote many posts about RGB LED Matrix in my blog . I like to display the screen using OpenCV on the Raspberry Pi to the RGB LED Matrix. However, the TetrisClock shown in the figure above works on the Arduino family of ESP32 MCUs. I also posted a post implementing TetrisClock on ESP32 at https://iot-for-maker.blogspot.com/2020/04/led-9-rgb-led-matrix-drive-with-esp-32.html . But I wanted to implement this beautiful clock in Raspberry Pi, so I googled hard, but couldn't find any good examples. Eventually, I decided to analyze the code written in C language and implement it in Python and OpenCV. In the picture above, it consists of four large numbers indicating hours, minutes and small letters indicating morning(AM) and afternoon(PM). Original code analysis Number ...
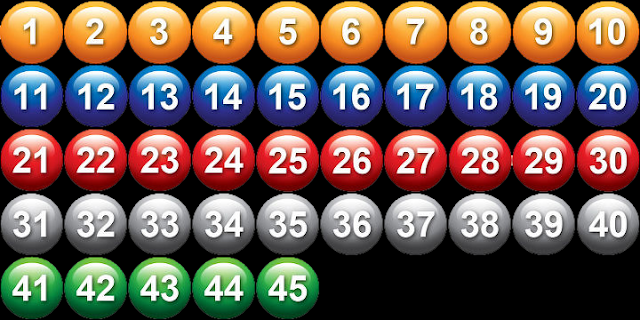
Image Processing #9 - Image Splitting

이미지
Recently, I had to separate a image containing multiple balls. In the case of one or two balls, you can use an image editing program to separate them, but if the number of images increases, it can be much faster to create a simple program to separate them. <lotto.png> If you use numpy's hsplit and vsplit functions, you can separate the images into N by M pieces. You can separate lottery balls into 1 ~ 45.png files with the following simple code. #-*- coding:utf-8 -*- import numpy as np import cv2 # split into 10 X 5 H_Count = 10 V_Count = 5 file = './lotto.png' img = cv2 . imread(file, cv2 . IMREAD_COLOR) height, width, channels = img . shape count = 1 h_img = np . vsplit(img, V_Count) for i in h_img: j = np . hsplit(i, H_Count) for k in j: name = "%d.png" % (count) cv2 . imwrite(name, k) count += 1 <img_split.py> <splitted image files> ...

Image Processing #8 - Image Append

이미지
Occasionally, images need to be pasted horizontally or vertically. In this article, we will implement this function using the numpy function commonly used in OpenCV and PIL. Convert image to numpy array  The first thing you must do is to convert the image to a numpy array. This is explained at https://opencvcooking.blogspot.com/2019/11/basic-cooking-1.html . OpenCV Image to numpy vice versa OpenCV images (Mat) have a numpy array and can be used directly without conversion. import cv2 img = cv2 . imread( "dog.jpg" , cv2 . IMREAD_COLOR) print(type(img)); And you can convert numpy array to an OpenCV image using fromarray function. import cv2 img = cv . fromarray(array) height, width, channels = img . shape PIL Image to numpy vice versa from PIL import Image im = Image . fromarray(np . uint8(array)) array = np . asarray(im, dtype = "uint8" ) And you can convert numpy array to an PIL image using fromarray functio...