Video Processing Speed up
The structure of reading video files and processing frames in OpenCV is as follows.
cap = cv2.VideoCapture(videofile)
while True:
    ret, frame = cap.read()
    if ret == False:
        break
    '''
    Do what you want to do
    '''
cv2.destroyAllWindows()
cap.release()
In the while loop, the cap.read() function is responsible for reading frames from the video file. This function is fast on devices with good CPU performance, but SBC like Raspberry Pi has a lot less CPU performance than PC. The time it takes to process the cap.read() function depends on the video file.
If the video file frame size is large, or if a video codec that requires a lot of time in the decoding process is used, the frame reading time will be longer.
In the code above, the while loop consists of two parts.
- Read video frame
- Process of processing the read frame according to the purpose
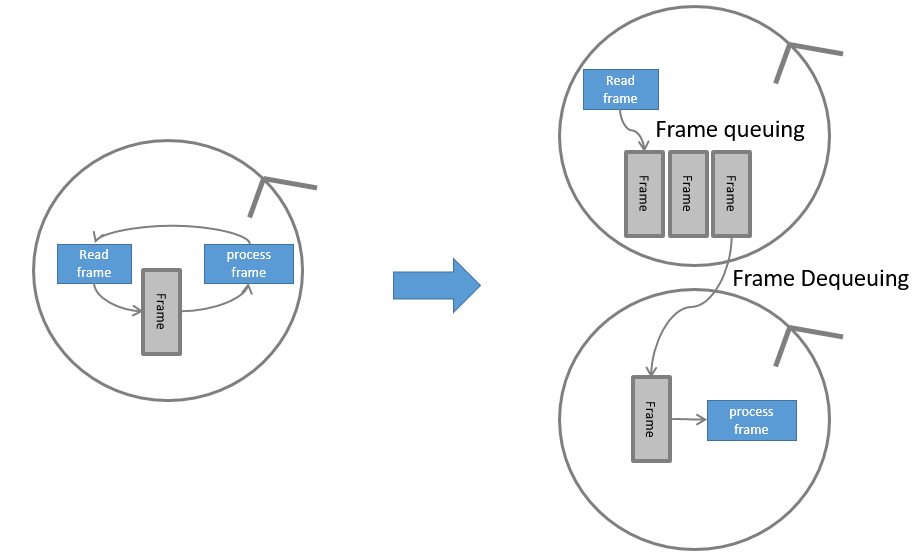
However, since these operations are performed sequentially, processing cannot be performed while reading video frames and frames cannot be read while processing video.
Therefore, if the process of reading the frame and the process of processing the frame can be simultaneously performed, the processing time can be shortened.
That is, if two tasks are performed simultaneously using the multi-threading technique, the processing speed will be increased.
Much of the source code here is from Adrian Rosebrock's Faster video file FPS with cv2.VideoCapture and OpenCV.
Reading video frames using MultiThreading
Most CPUs these days are multicore. Many SBCs, including Raspberry Pi, also use multi-core CPUs. Therefore, if the function of reading a frame and processing a frame are executed on two cores, time delay due to sequential processing can be reduced.
<Sequential Processing to Multi Processing>
The following code reads a video frame using sequential processing that is commonly used.
# import the necessary packages
import numpy as np
import argparse
import time
import cv2

# construct the argument parse and parse the arguments
ap = argparse.ArgumentParser()
ap.add_argument("-v", "--video", required=True,
	help="path to input video file")
args = ap.parse_args()


cap = cv2.VideoCapture(args.video)
start = time.time()
index = 1
while True:
    s = time.time()
    ret, frame = cap.read()
    if ret == False:
        break
    e = time.time()
    '''
    cv2.putText(frame, "Hello World", (10, 30), cv2.FONT_HERSHEY_SIMPLEX, 0.6, (0, 255, 0), 2)
    cv2.putText(frame, "FPS:%3.1f"%(1 / (e - s)), (10, 60), cv2.FONT_HERSHEY_SIMPLEX, 0.6, (0, 255, 0), 2)
    img = frame.copy()
    img = cv2.cvtColor(img, cv2.COLOR_BGR2GRAY)
    '''
    #print('%04d fps:%f'%( index, 1 / (time.time() -s)))
    index += 1

end = time.time()
print("[INFO] Total time:%f"%(end - start))
print("[INFO] approx. FPS:%f"%( index / (end - start)))
cv2.destroyAllWindows()
cap.release()
<normal_video.py>
And the following code uses multicore to read a video frame.
from filevideostream import FileVideoStream
import numpy as np
import argparse
import time
import cv2

# construct the argument parse and parse the arguments
ap = argparse.ArgumentParser()
ap.add_argument("-v", "--video", required=True,
	help="path to input video file")
args = ap.parse_args()
print("[INFO] starting video file thread...")
fvs = FileVideoStream(args.video).start()
time.sleep(1.0)
index = 1
start = time.time()
while fvs.more():
    s = time.time()
    exist, end = fvs.more()
    if end:
        break
    if exist == False:
        time.sleep(0.001)
        continue
    frame = fvs.read()
    e = time.time()
    '''
    cv2.putText(frame, "Hello World", (10, 30), cv2.FONT_HERSHEY_SIMPLEX, 0.6, (0, 255, 0), 2)
    cv2.putText(frame, "FPS:%3.1f"%(1 / (e - s)), (10, 60), cv2.FONT_HERSHEY_SIMPLEX, 0.6, (0, 255, 0), 2)
    img = frame.copy()
    img = cv2.cvtColor(img, cv2.COLOR_BGR2GRAY)
    '''
    #print('%04d fps:%f'%( index, 1 / (time.time() -s)))
    index += 1

end = time.time()
print("[INFO] Total time:%f"%(end - start))
print("[INFO] approx. FPS:%f"%( index / (end - start)))

cv2.destroyAllWindows()
fvs.stop()
<fast_video.py>
Now let's compare the performance of the two codes. I used Raspberry Pi 4 2GB for the test.
root@DietPi:/usr/local/src/study/video_speed# python3 normal_video.py --video='/usr/local/src/image/Frozen2.mp4'
[INFO] Total time:57.469023
[INFO] approx. FPS:78.999081

root@DietPi:/usr/local/src/study/video_speed# python3 fast_video.py --video='/usr/local/src/image/Frozen2.mp4'
[INFO] starting video file thread...
[INFO] Total time:55.420395
[INFO] approx. FPS:81.919301
The multi-processing method is slightly 4% faster, but there is no big difference. The difference between the two is that there is no frame processing. There is little difference in performance since both methods only have code to read frames.
However, if frame processing is added, it is not possible to read a new frame during frame processing in the single processing method, but it is different in the multi processing method.
In the multi-processing method, during the frame processing time, new video frames are continuously read and stored in the queue.
Uncomment the next commented part in the code above.
'''
cv2.putText(frame, "Hello World", (10, 30), cv2.FONT_HERSHEY_SIMPLEX, 0.6, (0, 255, 0), 2)
cv2.putText(frame, "FPS:%3.1f"%(1 / (e - s)), (10, 60), cv2.FONT_HERSHEY_SIMPLEX, 0.6, (0, 255, 0), 2)
img = frame.copy()
img = cv2.cvtColor(img, cv2.COLOR_BGR2GRAY)
'''
cv2.putText(frame, "Hello World", (10, 30), cv2.FONT_HERSHEY_SIMPLEX, 0.6, (0, 255, 0), 2)
cv2.putText(frame, "FPS:%3.1f"%(1 / (e - s)), (10, 60), cv2.FONT_HERSHEY_SIMPLEX, 0.6, (0, 255, 0), 2)
img = frame.copy()
img = cv2.cvtColor(img, cv2.COLOR_BGR2GRAY)
'''
Then run it again.
root@DietPi:/usr/local/src/study/video_speed# python3 normal_video.py --video='/usr/local/src/image/Frozen2.mp4'
[INFO] Total time:101.466784
[INFO] approx. FPS:44.743707
root@DietPi:/usr/local/src/study/video_speed# python3 fast_video.py --video='/usr/local/src/image/Frozen2.mp4'  [INFO] starting video file thread...
[INFO] Total time:76.281368
[INFO] approx. FPS:59.437843
This time, we can see that the multi-core method has a performance improvement of about 34%.
Wrapping up
The performance improvement when multi-core processing of video frames in OpenCV depends on frame processing time. When the frame reading time and the frame processing time are similar, the highest performance improvement is possible. However, if there is no processing time or too long, the effect of multi-processing decreases.
The source code can be downloaded from https://github.com/raspberry-pi-maker/OpenCV.


댓글
댓글 쓰기